Consent Node
The Consent Node is a user-facing workflow node that presents consent items to the end user and records their response.
Use a Consent Node when a workflow needs the user to review and accept one or more consent statements before continuing. Each consent item can be configured as required or optional, and the user must enter a typed signature before submitting the consent step.
Once submitted, the consent responses and signature are saved to the submission and can be used later in the workflow.
How the Consent Node works
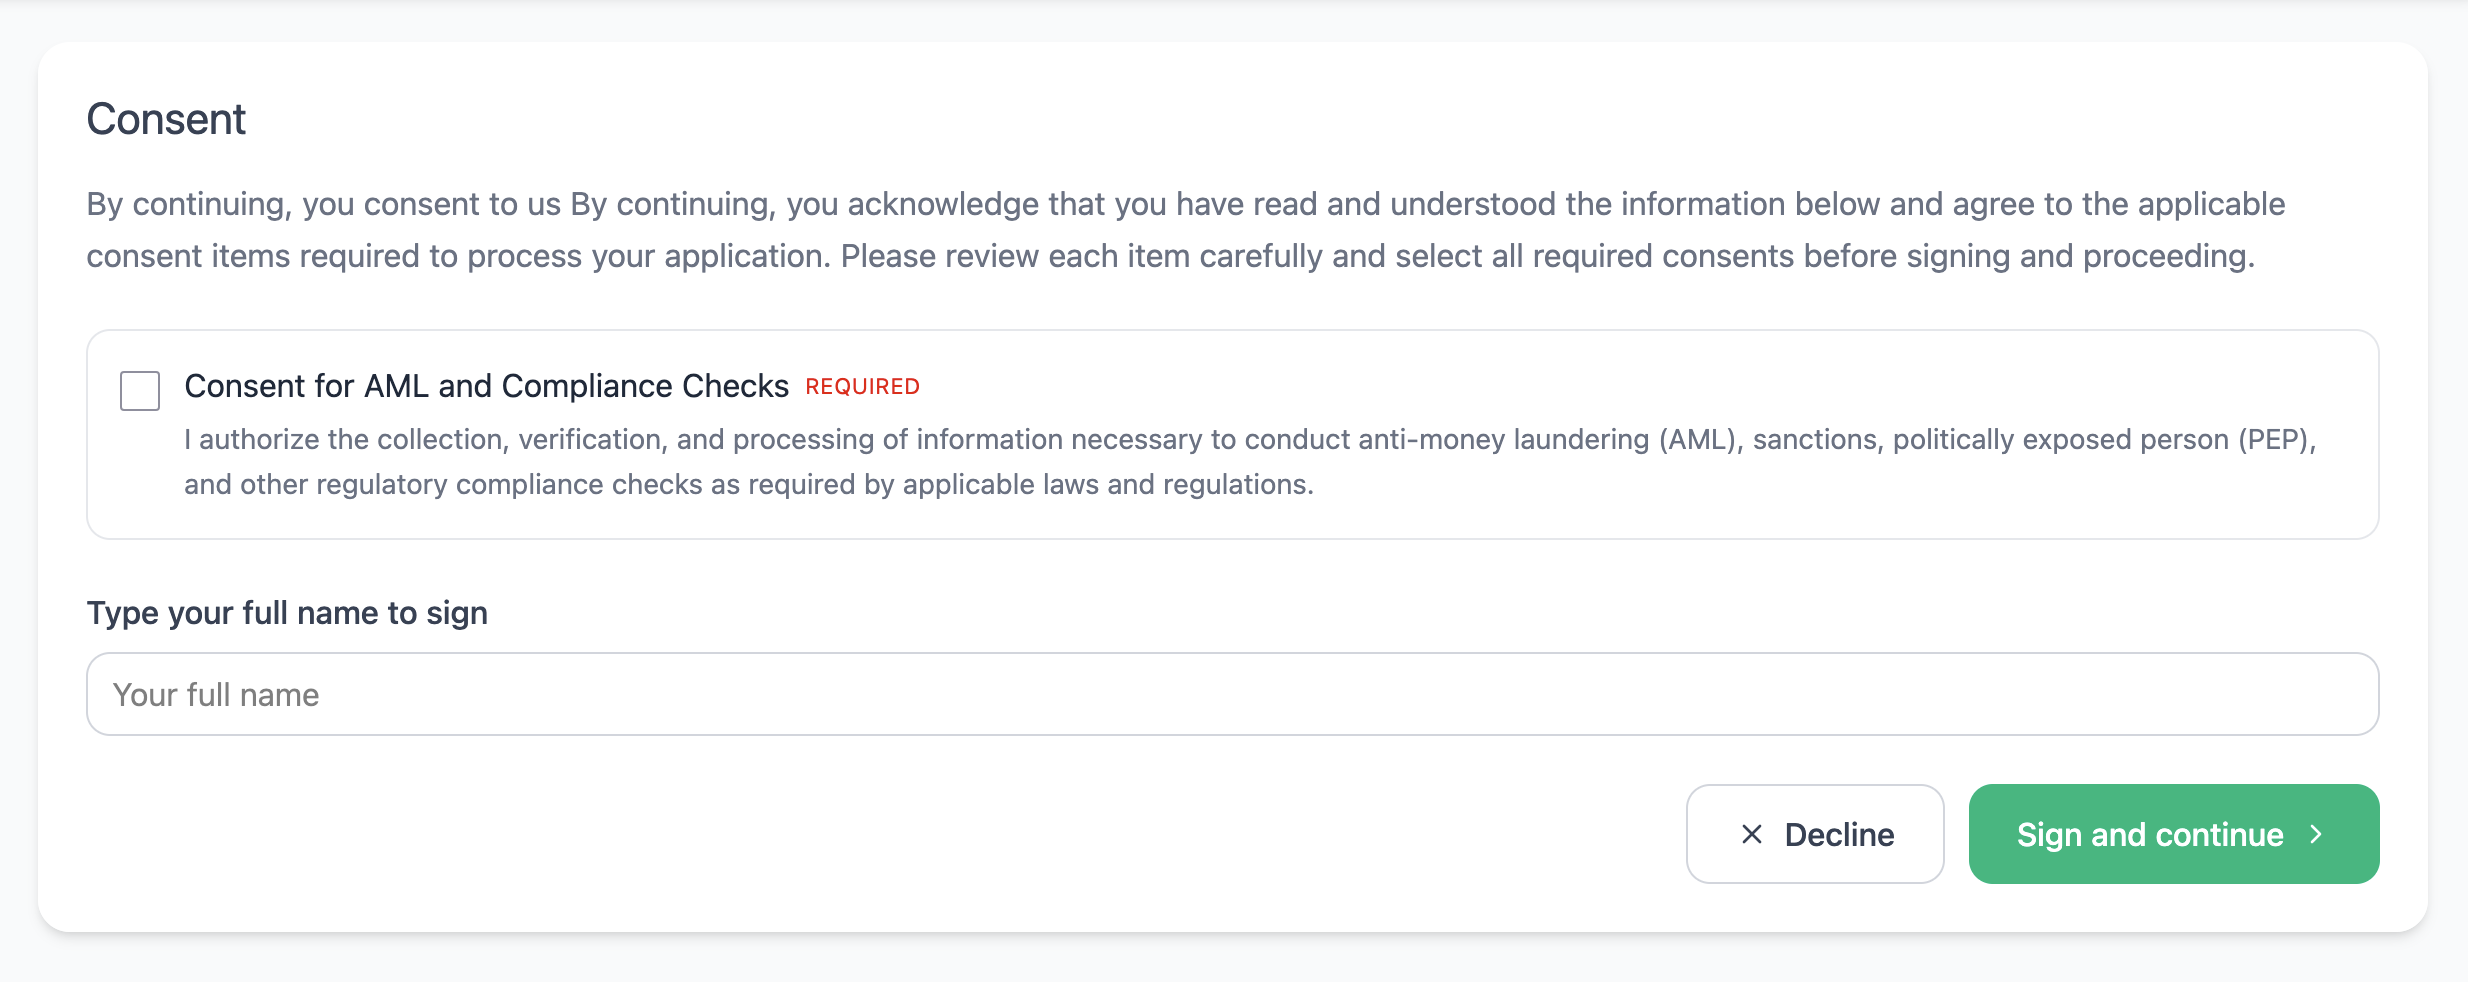
When a workflow reaches a Consent Node, the end user sees:
- a list of consent items to review
- controls for accepting or declining each item
- a signature field
- a submit button
Required consent items must be accepted before the user can continue. Optional consent items can be declined without blocking workflow progress.
After the user submits the consent step, the workflow continues to the next connected node.
Consent item configuration
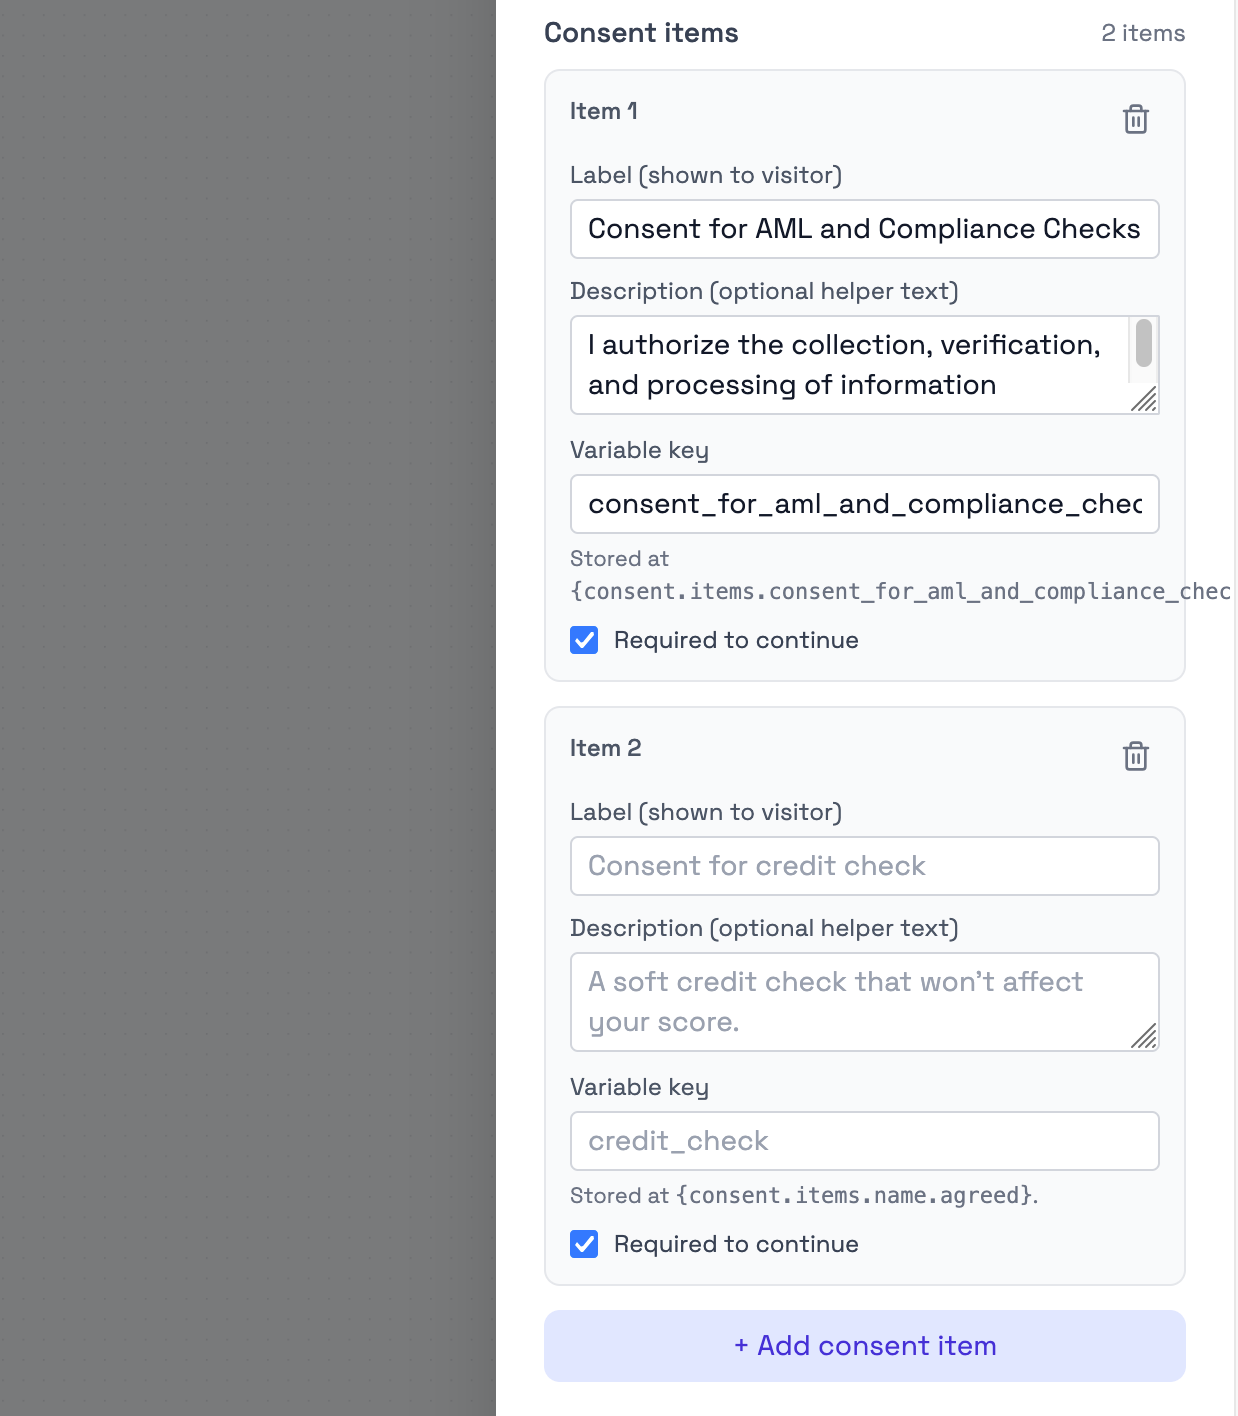
Consent items are configured in the Consent Node settings.
Each consent item represents a statement, agreement, policy, or permission that the user should review.
To add a consent item:
- Open the Consent Node settings.
- Click Add Consent Item.
- Enter the item name and description.
- Set the item as Required or Optional.
- Save the workflow.
Each configured item appears as a separate consent option in the end-user flow.
Consent item fields
Each consent item includes the following fields:
| Field | Description |
|---|---|
| Item Name | The title shown to the user, such as “Terms of Service” or “Privacy Policy”. |
| Item Description | Additional text explaining what the user is accepting or declining. |
| Required | Controls whether the user must accept the item before continuing. |
| Item ID | Internal identifier used for tracking the consent item in submission data. |
Required and optional consent items
Consent items can be either required or optional.
Required items
When a consent item is required:
- the user must accept it before continuing
- the consent form cannot be submitted until the item is accepted
- the workflow does not advance until all required items are accepted
Use required items for consent that is necessary for the workflow to continue.
Optional items
When a consent item is optional:
- the user can accept or decline it
- declining the item does not show a validation error
- the workflow can continue even if the item is declined
Use optional items for supplementary consent, such as optional communication preferences or additional services.
Digital signature
The Consent Node includes a signature field where the user enters their name or other requested signature text.
The signature field is a text input. Users type their signature instead of drawing a handwritten signature.
The signature field is required. The user cannot submit the consent step without entering text in the signature field.
When the consent step is submitted, Bynn records:
- the typed signature
- the selected consent responses
- the submission time
The system records the signature text exactly as entered by the user.
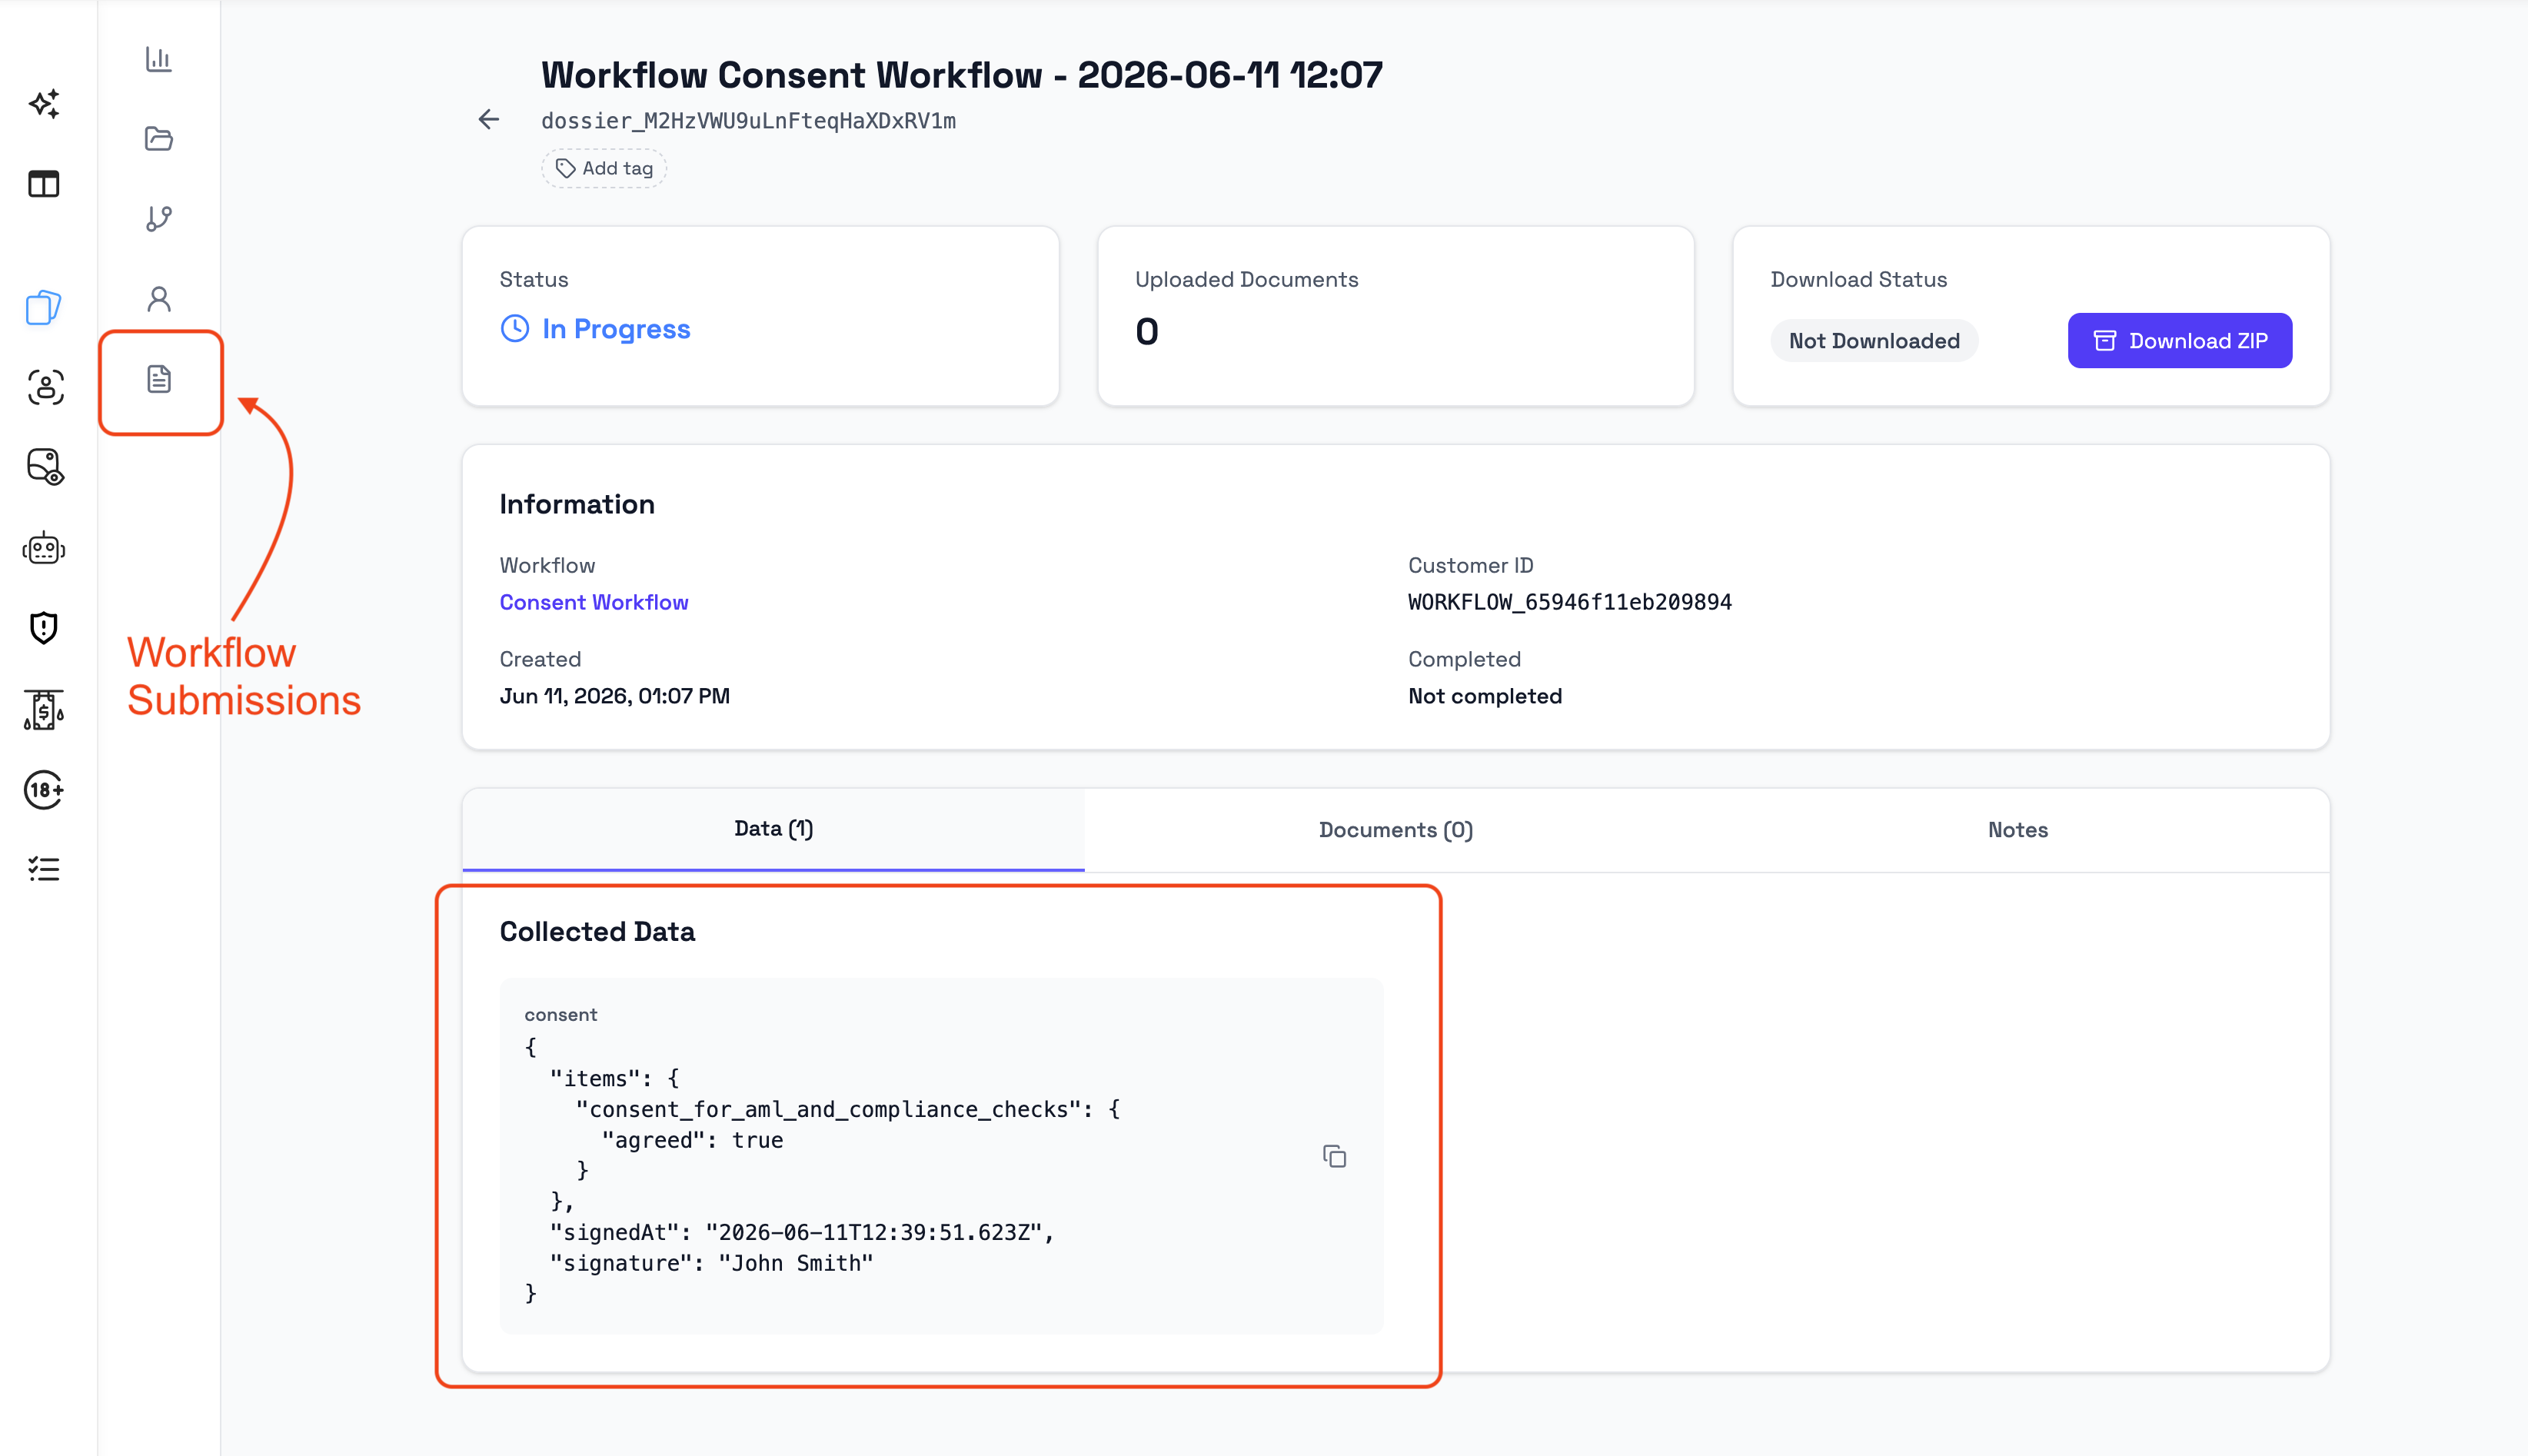
Consent data
When the user submits a Consent Node, Bynn stores the consent result as submission data.
Consent data can include:
- each consent item
- whether each item was accepted or declined
- the typed signature
- the submission timestamp
Consent data can be reviewed in the submission details and used by later workflow steps that support workflow variables.
Events and audit trail
Consent activity can be recorded in the submission timeline and audit history.
Depending on the workspace configuration, consent-related events may include:
- consent submitted
- required consent accepted
- required consent declined
- optional consent accepted or declined
These events help admins review what happened during the workflow and when the consent step was completed.
Using the Consent Node in workflows
The Consent Node can be placed anywhere in a workflow where user agreement is required.
Common placements include:
- before document collection
- before data processing
- before final submission
- before a step that depends on explicit user permission
Example workflow patterns:
Start → Screen → Consent Node → ApproveStart → Identity Verification → Consent Node → Document Collection → ApproveStart → Decision Node → Consent Node → Email Notification → ApproveThe Consent Node is a user-facing node. It must have an input connection and can connect to the next workflow step after consent is submitted.

In the example above, the Consent node is used to obtain the applicant's consent for AML and compliance screening. Once consent has been provided, the workflow uses the identity information collected during the Identity Verification step to perform an AML Check before continuing the onboarding process.
Output path
The Consent Node has one output path:
| Output | Description |
|---|---|
| Continue | Routes the submission to the next connected node after consent is submitted. |
If required consent items are not accepted, the workflow does not continue.
Best practices
Use clear and specific consent item descriptions.
Good consent descriptions should be:
- specific about what the user is agreeing to
- written in plain language
- short enough to read in the workflow
- clear about whether the consent is required or optional
Good example
Item Name: Privacy Policy

Description: I consent to the collection and use of my personal data as described in the privacy policy. My data will be used to process my application and may be shared with third-party verification providers.
Poor example
Item Name: Privacy

Description: The controller may process data.
Configuration recommendations
- Mark an item as Required only when the workflow cannot continue without that consent.
- Use Optional for supplementary permissions, such as optional marketing communication.
- Keep consent descriptions short and understandable.
- Avoid combining unrelated consent items into one checkbox.
- Use multiple consent items when each consent needs to be tracked separately.
- Use multiple Consent Nodes if consent is needed at different stages of the workflow.
Notes
- Consent Nodes require explicit user action.
- Required consent items must be accepted before the workflow can continue.
- Optional consent items can be declined.
- The signature field uses typed text, not a drawn signature.
- Consent responses are saved to the submission.
- Multiple Consent Nodes can be used in the same workflow.
Updated about 2 months ago